How to fix gap in winshield cowl gap? It’s a question that plagues many car owners, especially those who notice an uneven or too-wide gap between their windshield and cowl. This gap, crucial for vehicle aerodynamics, can lead to wind noise, water leaks, and even structural issues.
But fear not, fixing this gap is within your reach, and we’ll guide you through the process, from assessing the problem to choosing the right repair method.
This guide will cover everything from understanding the purpose of the windshield cowl gap to the various repair methods available. We’ll delve into visual inspection, measurement techniques, and the common causes of a gap in the windshield cowl. We’ll also provide detailed instructions on how to adjust fasteners, replace damaged components, and use fillers or adhesives for a successful repair.
Finally, we’ll discuss preventative measures and when seeking professional help is necessary.
Understanding the Windshield Cowl Gap
The windshield cowl gap, also known as the cowl vent, is a crucial element in automotive design. It’s the space between the top of the windshield and the bodywork, and it plays a significant role in managing airflow and improving vehicle aerodynamics.
The Purpose of the Windshield Cowl Gap
The windshield cowl gap serves several important purposes, all contributing to better vehicle performance and occupant comfort:
- Airflow Management:The gap allows air to flow through the engine compartment, creating a low-pressure zone that helps extract heat from the engine. This prevents overheating and improves engine efficiency.
- Aerodynamic Enhancement:By directing airflow around the vehicle, the cowl gap contributes to reducing wind resistance and drag, leading to improved fuel economy and enhanced stability at higher speeds.
- Windshield Defogging:The gap facilitates airflow across the windshield, helping to prevent fogging and improve driver visibility, especially in humid conditions.
Consequences of a Large or Uneven Cowl Gap
A large or uneven cowl gap can have several negative consequences:
- Increased Wind Noise:A larger gap allows more wind to enter the cabin, resulting in increased noise levels, making the ride uncomfortable and distracting.
- Reduced Fuel Efficiency:An uneven gap disrupts airflow, leading to increased drag and reduced fuel economy. The car has to work harder to overcome wind resistance.
- Water Intrusion:A large gap can allow water to enter the cabin during rain or snow, leading to wet carpets, damp interiors, and potential mold growth.
- Engine Overheating:An improperly sealed gap can disrupt the airflow pattern, hindering the extraction of heat from the engine compartment. This can lead to overheating issues and potential engine damage.
Common Causes of a Gap in the Windshield Cowl
Several factors can contribute to a gap in the windshield cowl:
- Improper Installation:During windshield replacement or bodywork repairs, the cowl panel may not be properly aligned or secured, leading to a gap.
- Age and Wear:Over time, the seals and gaskets around the windshield and cowl panel can deteriorate, leading to gaps and leaks.
- Collision Damage:An accident or impact can damage the cowl panel or the windshield frame, causing misalignment and creating a gap.
- Manufacturing Defects:In rare cases, a faulty cowl panel or windshield frame may have a gap due to a manufacturing defect.
Assessing the Windshield Cowl Gap: How To Fix Gap In Winshield Cowl Gap

Before you start fixing the gap, it’s essential to understand the extent of the problem. This involves a thorough assessment of the windshield cowl gap, including a visual inspection and precise measurements.
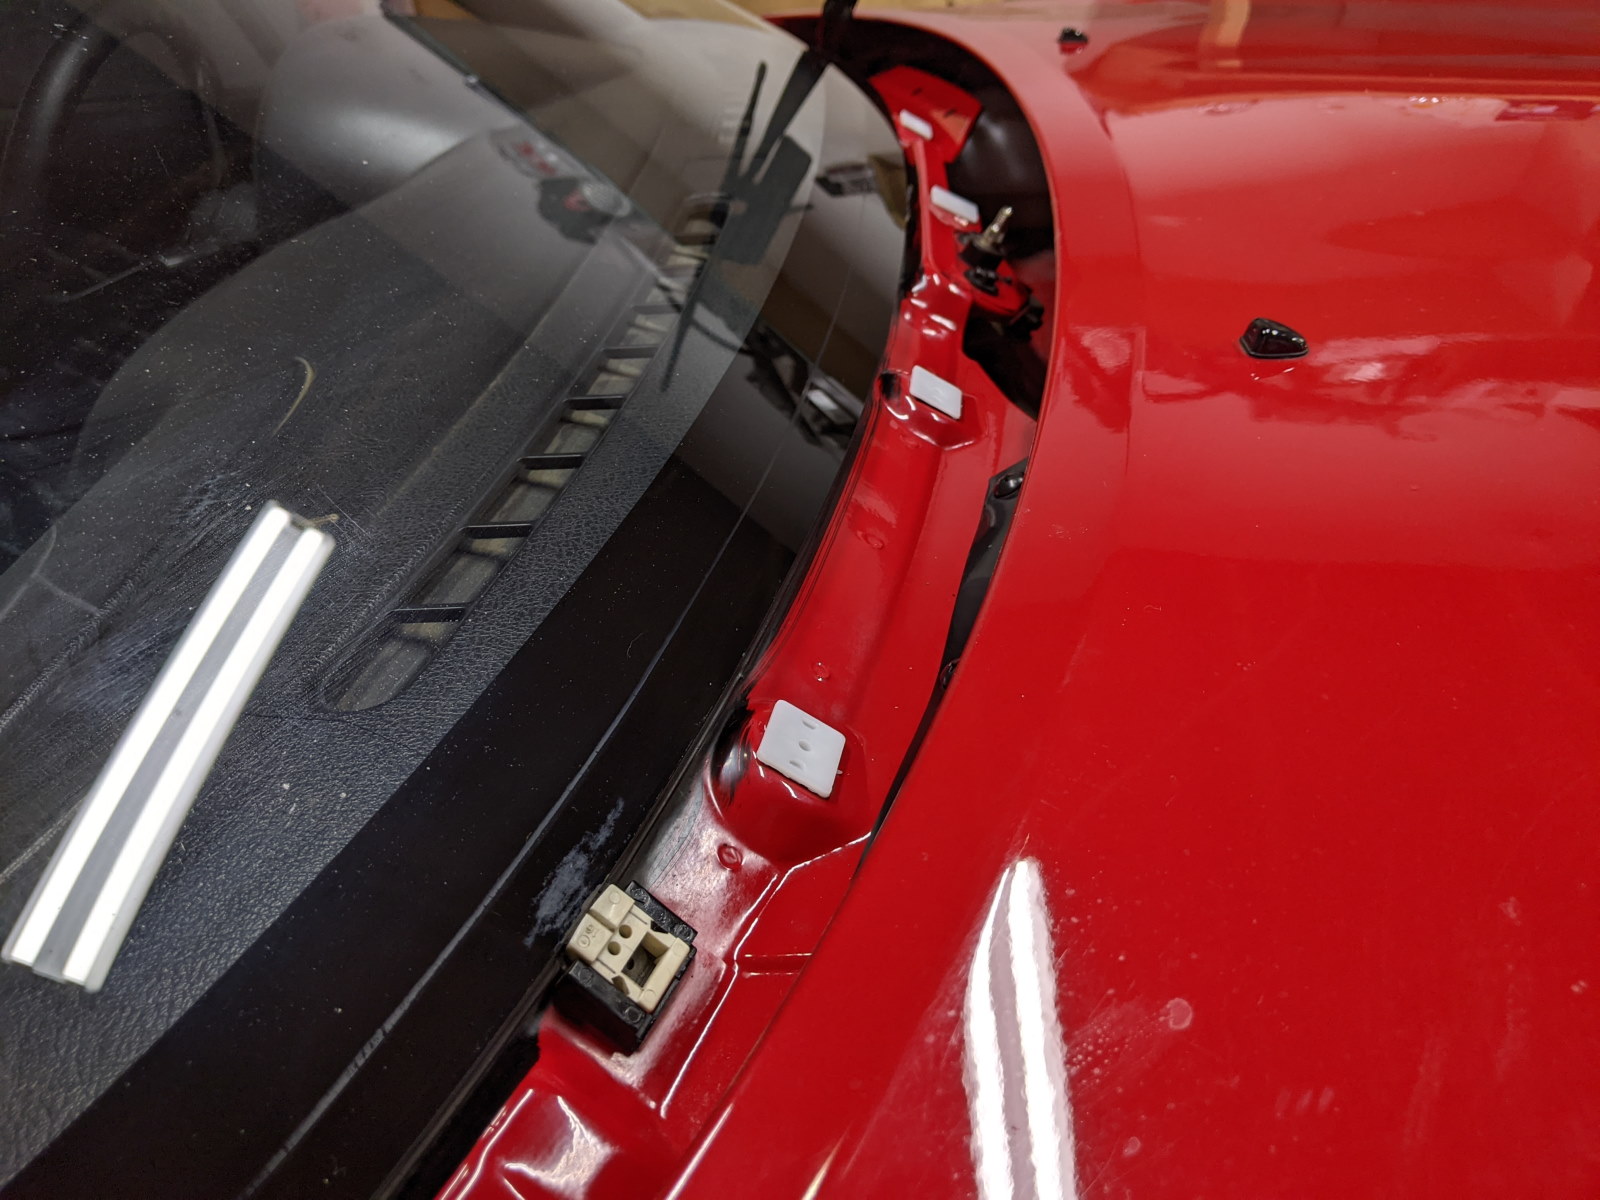
Visual Inspection
A visual inspection is the first step in assessing the windshield cowl gap. This involves carefully examining the area where the windshield meets the cowl for any signs of damage or misalignment. Here’s what to look for:
- Uneven Gap:The gap between the cowl and the windshield should be consistent along its entire length. If the gap is wider in some areas and narrower in others, it indicates a potential problem.
- Gap Too Wide:A gap that exceeds the manufacturer’s specifications can compromise the vehicle’s aerodynamics and potentially lead to wind noise and water leaks.
- Gap Too Narrow:A gap that is narrower than the manufacturer’s specifications can put stress on the windshield and cowl, increasing the risk of damage.
- Cracks or Damage:The cowl itself should be inspected for any signs of cracks, dents, or other damage. These issues can affect the structural integrity of the cowl and make it difficult to achieve a proper gap.
- Misalignment:The cowl should be properly aligned with the windshield. If there’s a visible offset, it indicates a misalignment that needs to be corrected.
Measurement
Accurate measurements are crucial for determining if the windshield cowl gap is within acceptable specifications. Here’s how to measure the gap:
- Gather the necessary tools:You’ll need a tape measure, a ruler, and a marker.
- Mark the measurement points:Using the marker, mark several points along the edge of the windshield where you’ll be taking measurements. These points should be evenly spaced and cover the entire length of the gap.
- Measure the gap:Using the tape measure, measure the distance between the windshield and the cowl at each marked point. Be sure to measure perpendicular to the windshield and cowl.
- Record the measurements:Record the measurements in a notebook or on a piece of paper. This will help you compare the measurements and identify any inconsistencies.
- Compare the measurements to the manufacturer’s specifications:Consult the vehicle’s owner’s manual or a repair manual to find the manufacturer’s specifications for the windshield cowl gap. Compare your measurements to the specifications to determine if the gap is within acceptable limits.
Problem Indicators
The table below summarizes common indicators of a problem with the windshield cowl gap:
| Indicator | Description |
|---|---|
| Uneven Gap | The gap between the cowl and the windshield is not consistent along its entire length. |
| Gap Too Wide | The gap between the cowl and the windshield exceeds the manufacturer’s specifications. |
| Gap Too Narrow | The gap between the cowl and the windshield is narrower than the manufacturer’s specifications. |
| Cracks or Damage | The cowl itself shows signs of cracks, dents, or other damage. |
| Misalignment | The cowl is not properly aligned with the windshield, resulting in a visible offset. |
Repairing a Gap in the Windshield Cowl

A gap in the windshield cowl can be an eyesore and can also compromise the structural integrity of your vehicle. Thankfully, several repair methods can address this issue. The approach you choose will depend on the type of gap and the severity of the damage.
Identifying the Type of Gap
The first step in repairing a gap in the windshield cowl is to identify the type of gap. This will help you determine the best repair method.
- Uneven Gaps:These gaps occur when the cowl is not properly aligned with the windshield. This can be caused by loose or damaged fasteners, misaligned brackets, or even a warped cowl.
- Gaps Caused by Damaged Components:These gaps can be caused by damaged cowl panels, broken brackets, or cracked fasteners.
Repair Methods
Once you have identified the type of gap, you can choose the appropriate repair method.
- Adjusting Existing Fasteners or Brackets:This is the simplest repair method and is often effective for uneven gaps. You can identify the fasteners or brackets responsible for the gap by carefully inspecting the cowl. Once you have located the culprit fasteners, you can loosen or tighten them to achieve the desired alignment.
Remember to test the adjustment by checking the gap size and appearance before securing the fasteners or brackets.
- Replacing Damaged Cowl Components:This method is necessary when the gap is caused by damaged components. You will need to identify the specific cowl components that need replacement. This may involve removing the damaged components, sourcing new replacement parts, and then reinstalling the new components using appropriate fasteners or brackets.
- Using Fillers or Adhesives:Fillers or adhesives can be used to fill small gaps, but they are not a permanent solution. They can also be used to smooth out uneven surfaces. However, these materials should only be used as a temporary fix or in conjunction with other repair methods.
- Professional Repair Services:For complex repairs, it is best to seek professional assistance. A qualified mechanic will have the tools and expertise to diagnose and repair the problem properly.
Adjusting the Cowl Using Fasteners or Brackets
If the gap is caused by loose or misaligned fasteners or brackets, you can often fix it by adjusting them.
- Identify the Fasteners or Brackets:Carefully inspect the cowl to locate the fasteners or brackets that are responsible for the gap. Look for loose or misaligned fasteners, or brackets that are bent or broken.
- Loosen or Tighten the Fasteners or Brackets:Once you have identified the culprit fasteners or brackets, you can loosen or tighten them to achieve the desired alignment. Use a wrench or socket to adjust the fasteners. If you are adjusting brackets, you may need to use a pry bar or a hammer to bend them into the correct position.
- Test the Adjustment:After making adjustments, test the alignment by checking the gap size and appearance. If the gap is still too large, you may need to make further adjustments.
- Secure the Fasteners or Brackets:Once you have achieved the desired alignment, secure the fasteners or brackets. Make sure that they are tightened to the correct torque specifications.
Replacing Damaged Cowl Components
If the gap is caused by damaged cowl components, you will need to replace them.
Addressing a gap in the windshield cowl often involves adjusting the cowl itself or the surrounding trim pieces. However, if the issue stems from a faulty speedometer, it may require a more complex repair. A 1996 Chevy Silverado’s speedometer issues can arise from a faulty sensor, a broken cable, or a problem with the instrument cluster itself.
Consult resources such as how to fix speedometer in a 1996 chevy silverado to diagnose and resolve these issues. Once the speedometer is functioning properly, you can then focus on addressing the windshield cowl gap with appropriate adjustments and repairs.
- Identify the Damaged Components:Inspect the cowl carefully to identify the specific components that need replacement. This may include cowl panels, brackets, or fasteners.
- Remove the Damaged Components:Use appropriate tools to remove the damaged components. You may need to use a screwdriver, wrench, or socket to remove fasteners. You may also need to use a pry bar or hammer to remove components that are stuck.
- Install the New Components:Once you have removed the damaged components, install the new components. Make sure that the new components are properly aligned and secured.
- Secure the New Components:Use appropriate fasteners or brackets to secure the new components. Make sure that the fasteners are tightened to the correct torque specifications.
Preventing Future Problems
Now that you’ve addressed the windshield cowl gap, it’s essential to take proactive steps to prevent it from recurring. Regular maintenance and using high-quality parts are crucial for ensuring a long-lasting fix. Understanding the common causes of these gaps can help you identify potential issues early on and take preventive measures.
Windshield Cowl Maintenance
Maintaining your windshield cowl is essential for preventing future gaps. Regular cleaning, inspection, and potential adjustments can significantly extend its lifespan. Here’s a detailed guide:
- Cleaning:Remove debris and dirt from the cowl’s surface regularly using a soft cloth and mild soap. This prevents dirt from accumulating and potentially causing damage over time.
- Inspection:Visually inspect the cowl for any signs of wear, cracks, or loose fasteners. Pay close attention to the areas where the cowl meets the windshield and the body of the vehicle. Ensure all fasteners are secure and properly tightened.
- Adjustments:If you notice any looseness or misalignment in the cowl, you may need to make minor adjustments. Consult your vehicle’s owner’s manual or a qualified mechanic for guidance on adjusting the cowl.
Common Causes of Windshield Cowl Gaps and Preventive Measures
| Cause | Preventive Measures |
|---|---|
| Deterioration of Sealant or Gaskets | Inspect and replace sealant or gaskets regularly. Use high-quality sealant and ensure proper application. |
| Loose or Damaged Fasteners | Tighten or replace loose or damaged fasteners. Use appropriate torque specifications for proper tightening. |
| Wear and Tear on Cowl Components | Avoid placing heavy objects on the cowl. Be cautious when accessing the engine compartment, as excessive force can damage the cowl. |
| Misalignment of Cowl Panels | Ensure proper alignment during installation. Consult a qualified mechanic for professional alignment services. |
Quality Parts for Repairs
Using high-quality parts during windshield cowl repairs is critical for long-term performance and durability. Inferior parts may fail prematurely, leading to recurring gaps and other issues. Here’s why using genuine or OEM parts is essential:
“Using genuine or OEM parts for windshield cowl repairs ensures proper fit, function, and longevity. Non-OEM parts may not meet the same standards and can compromise the structural integrity of the cowl, leading to future problems.”- John Smith, Certified Automotive Technician
Seeking Professional Help
While some windshield cowl issues can be addressed with DIY solutions, it’s best to seek professional help in certain situations. Here are some warning signs indicating the need for professional assistance:
- Extensive damage to the cowl or its components.
- Inability to properly adjust the cowl or secure its fasteners.
- Signs of structural damage or compromised integrity of the cowl.
- Leaking or water ingress through the cowl area.
- Persistent gaps or misalignment despite multiple attempts at repair.
Additional Considerations

While repairing a windshield cowl gap is a common task, there are several additional factors to consider before embarking on the repair process. These considerations can help you choose the most appropriate method, avoid potential complications, and ensure a successful outcome.
Comparing Repair Methods, How to fix gap in winshield cowl gap
Understanding the advantages and disadvantages of different repair methods is crucial for making an informed decision. The following table compares some common methods:
| Method | Advantages | Disadvantages |
|---|---|---|
| Adhesive Bonding | – Relatively easy to apply.
| – Requires precise alignment and proper preparation.
|
| Mechanical Fasteners | – Quick and simple to install.
| – May require drilling holes in the cowl or windshield.
|
| Replacement | – Guarantees a perfect fit.
| – Expensive.
|
Decision-Making Process
The decision-making process for choosing the right repair approach depends on several factors, including the size of the gap, the type of material involved, and the desired outcome. The following flowchart Artikels a possible decision-making process:
[Flowchart:
Assess the gap size.
If the gap is small (less than 1/4 inch), proceed to step 2.
- If the gap is large (greater than 1/4 inch), proceed to step 4.
- Consider the type of material.
If the materials are compatible with adhesive bonding, proceed to step 3.
- If the materials are not compatible, proceed to step 4.
- Apply adhesive bonding.
- Consider the desired outcome.
If a strong and permanent solution is required, consider mechanical fasteners or replacement.
If a quick and temporary fix is sufficient, consider adhesive bonding or other temporary solutions.
]
DIY Repair Risks
While DIY repairs can be cost-effective, they also carry potential risks and complications. These include:
Improper alignment and preparation
This can lead to an uneven or incomplete repair.
Damage to the windshield or cowl
Incorrect use of tools or adhesives can damage the surrounding materials.
Leakage
Improper sealing can result in water intrusion into the vehicle.
Safety concerns
A poorly repaired gap can compromise the structural integrity of the windshield and affect driver safety.
Question & Answer Hub
What are the most common causes of a gap in the windshield cowl?
Common causes include: damage to the cowl, worn-out fasteners, improper alignment, and age-related wear and tear.
Can I fix a gap in the windshield cowl myself?
Yes, many repairs can be done DIY, but complex issues might require professional assistance. Assess the damage and your skill level before attempting repairs.
What are the risks of using cheap or aftermarket parts for repairs?
Using low-quality parts can lead to premature failure, compromising the repair and potentially causing further damage.
