How to fix a whistling toilet? It’s a common problem that can be both annoying and a sign of a deeper issue. The whistling sound is usually caused by a problem with the fill valve, flapper, or overflow tube in your toilet tank.
By understanding the potential causes and how to identify them, you can easily fix the problem and enjoy the peace and quiet of a silent toilet.
In this guide, we’ll walk you through the troubleshooting process, starting with a visual inspection of the toilet tank and components. We’ll cover how to test the water pressure, identify potential problems, and provide step-by-step instructions for fixing common issues like a faulty fill valve or a worn-out flapper.
Whether you’re a seasoned DIYer or a plumbing novice, this guide will empower you to tackle the whistling toilet with confidence.
Understanding the Problem

Imagine you’re chilling in your Bali villa, enjoying the serenity, and suddenly, your toilet starts whistling like a banshee. Don’t worry, it’s not a ghost, just a plumbing issue. It’s time to channel your inner plumber and get to the bottom of this musical mayhem.
Identifying the Source of the Whistling
The first step is to figure out where the whistling is coming from. Is it coming from the toilet tank, the bowl, or both? Is it a continuous whistle, like a teapot on the boil, or does it come and go, like a mischievous monkey?
Does the sound change when you flush the toilet? This can help narrow down the cause.
Common Causes of Whistling Toilets
Now, let’s dive into the possible culprits behind this annoying melody.
The Fill Valve
The fill valve is the plumbing hero that keeps your toilet tank topped up with water. It’s like the bartender in your toilet, ensuring there’s always a fresh glass of water ready for the next flush. Sometimes, the fill valve gets tired and starts to whistle.
This happens when the valve’s internal mechanism, which controls the water flow, gets worn out or clogged.
The incessant whistling of a toilet can be a maddening symphony of plumbing woes, often caused by a faulty flapper. Replacing the flapper is a simple fix, but it can take a while to find the right replacement. It’s like trying to diagnose a cylinder misfire in your car, you need to find the right part and get it installed.
How long does it take to fix a cylinder misfire ? Once you’ve replaced the flapper, the toilet should be silent again, leaving you with a sense of peace and quiet.
The Flapper
The flapper is the rubber seal that sits at the bottom of the toilet tank. It’s like the doorkeeper of your toilet, opening and closing to let water flow in and out. When the flapper gets old and worn, it can become leaky, causing water to constantly trickle into the bowl.
This constant flow of water can create a whistling sound.
The Overflow Tube
The overflow tube is a safety feature that prevents your toilet from overflowing. It’s like the lifeguard of your toilet, ensuring things don’t get too wet. If the overflow tube gets clogged, water can back up and create a whistling sound.
Examples of Different Whistling Sounds
Here’s a breakdown of different whistling sounds and their potential causes:* High-pitched, continuous whistling:This could be a sign of a faulty fill valve, a worn-out flapper, or a clogged overflow tube. It’s like a persistent mosquito buzzing in your ear.
Intermittent whistling
This could indicate a problem with the fill valve or the flapper. It’s like a bird chirping randomly.
Whistling that changes in pitch
This could indicate a problem with the fill valve or the overflow tube. It’s like a siren changing its tune.
2. Troubleshooting Steps
Troubleshooting a whistling toilet involves a methodical approach to identify the source of the problem. This can be done by carefully inspecting the toilet tank for leaks or issues, testing the water pressure, and understanding the potential causes behind the whistling sound.
Inspecting the Toilet Tank for Leaks or Issues
Examining the toilet tank is crucial for pinpointing the source of the whistling sound. A visual inspection and a thorough check of its components can reveal potential problems.
- Visual Inspection:
- Examine the tank for any visible cracks, rust, or discoloration. These signs can indicate damage or deterioration that may be contributing to the whistling sound.
- Check for water droplets on the tank exterior. This could be a sign of condensation or a leak, which can cause the whistling noise.
- Listen for any sounds of water running continuously, even when the toilet is not in use. This suggests a leak in the fill valve or a problem with the flapper.
- Checklist for Examining Components:
Component Inspection Points Fill Valve - Check for leaks around the base or at the connection point. This can indicate a faulty seal or a worn-out valve.
- Ensure the float is moving freely and not stuck. A stuck float can prevent the fill valve from shutting off properly, leading to a whistling sound.
- Test the fill valve by turning the water supply off and on. Observe if the valve operates smoothly and shuts off completely.
Flapper - Inspect for tears, cracks, or warping. These signs indicate wear and tear that can cause the flapper to leak, leading to a whistling sound.
- Ensure the flapper seals tightly against the outlet when the tank is full. A loose or worn-out flapper can allow water to leak into the bowl, creating a whistling sound.
- Test the flapper by flushing the toilet and observing if it closes completely. If the flapper doesn’t close properly, it will leak and cause a whistling sound.
Overflow Tube - Check if the overflow tube is positioned correctly and not obstructed. A misaligned or blocked overflow tube can cause water to overflow into the bowl, resulting in a whistling sound.
- Verify that the overflow tube is above the water level in the tank. If the overflow tube is below the water level, it can cause water to leak into the bowl, leading to a whistling sound.
Tank Bolts - Inspect for any loose or missing bolts. Loose bolts can cause the tank to leak, contributing to the whistling sound.
- Ensure the bolts are securely tightened. Tightening the bolts can prevent leaks and reduce the likelihood of whistling.
Testing Water Pressure
Water pressure plays a crucial role in the proper functioning of a toilet. Testing the water pressure can help identify potential issues related to the whistling sound.
- Locate the shut-off valve that controls the water supply to the toilet. This valve is usually found on the wall behind the toilet or underneath the sink.
- Turn off the water supply by closing the shut-off valve completely.
- Open a nearby faucet to release any remaining pressure in the line. This step ensures that the water pressure is properly tested.
- Check the water pressure by observing the flow rate and pressure of the water coming out of the faucet.
- Low pressure:This could indicate a problem with the water supply line or a blockage. Low water pressure can affect the toilet’s flushing ability and contribute to a whistling sound.
- High pressure:This can cause excessive wear and tear on the toilet components. High water pressure can put stress on the flapper, fill valve, and other parts, leading to leaks and whistling noises.
Identifying Potential Problems
Understanding the potential causes behind a whistling toilet can help you narrow down the source of the problem and determine the best course of action.
- Running toilet:This usually indicates a problem with the flapper, fill valve, or overflow tube. A running toilet can waste water and contribute to a whistling sound.
- Slow flushing:This could be caused by a clogged drain, a faulty flapper, or low water pressure. A slow flushing toilet can lead to poor sanitation and contribute to a whistling sound.
- Leaky toilet:This is often caused by a worn-out flapper, a leaking fill valve, or a cracked tank. A leaky toilet can waste water and contribute to a whistling sound.
- Toilet not filling:This could be due to a malfunctioning fill valve, a closed shut-off valve, or a blockage in the water supply line. A toilet that doesn’t fill properly can’t flush effectively and may cause a whistling sound.
Fixing the Fill Valve
The fill valve is responsible for controlling the water level in your toilet tank. If it’s not working properly, it can cause a variety of problems, including a whistling toilet. Here’s how to troubleshoot and fix a faulty fill valve.
Adjusting the Fill Valve Height and Water Level
The fill valve height and water level are crucial for proper toilet function. Adjusting these can help resolve whistling noises.
- Locate the Fill Valve:The fill valve is typically located at the back of the toilet tank. It’s a vertical pipe with a float attached to it.
- Adjust the Fill Valve Height:The fill valve height is adjusted using a nut or a screw on the side of the valve. To increase the water level, turn the nut or screw clockwise. To decrease the water level, turn it counterclockwise.
- Adjust the Water Level:The water level should be about an inch below the top of the overflow tube. This ensures that the toilet doesn’t overflow. To adjust the water level, you can use the float arm. To increase the water level, bend the float arm down.
To decrease the water level, bend the float arm up.
Addressing Flapper Issues: How To Fix A Whistling Toilet
The flapper is a crucial part of your toilet’s plumbing system. It acts like a gatekeeper, controlling the flow of water into the bowl. A faulty flapper can lead to a whistling sound, a telltale sign that something’s not quite right.
This sound is usually a result of water rushing through a small opening, creating a high-pitched whistle.
Understanding Flapper Whistling
A flapper is a rubber or plastic disc that seals the toilet tank’s outlet when the tank is full. When you flush, the flapper lifts, allowing water to flow into the bowl. When the tank empties, the flapper should seal tightly, preventing water from leaking into the bowl.
Flappers can wear out over time, leading to various issues, including whistling. Here are some common signs of flapper wear:* Torn rubber:This is a common problem that can cause the flapper to not seal properly, resulting in a high-pitched whistle.
Warped seals
Over time, the rubber seal around the flapper can warp or become brittle, causing leaks and whistling.
Loose fittings
If the flapper is not properly secured to the flush valve, it can wobble and create a whistling sound.The sound produced by a faulty flapper can vary depending on the type of wear. Here’s a table comparing different sounds and their possible causes:| Sound | Possible Cause ||—|—|| High-pitched whistle | Torn rubber, warped seals, loose fittings || Low rumble | Loose fittings, partially blocked flush valve || Gurgling sound | Air trapped in the pipes, faulty fill valve |
Visual Guide for Flapper Inspection and Replacement
Inspecting the FlapperTo inspect the flapper, follow these steps:
- Turn off the water supply.Locate the shut-off valve for your toilet and turn it off. This is usually located behind the toilet or near the wall.
- Flush the toilet.This will empty the tank and allow you to access the flapper.
- Inspect the flapper for wear and tear.Look for any tears, cracks, or warping in the rubber. Check if the flapper is properly secured to the flush valve.
Replacing the Flapper
- Remove the old flapper.Carefully lift the flapper off the flush valve.
- Install the new flapper.Place the new flapper onto the flush valve, ensuring it is properly seated.
- Secure the flapper.Some flappers have a chain that needs to be attached to the flush lever. Others have a clip that needs to be secured to the flush valve.
- Turn the water supply back on.Slowly turn the water supply valve back on, checking for leaks.
Flapper Parts and Functions| Part | Function | Image ||—|—|—|| Flapper | Seals the flush valve, preventing water from leaking into the bowl | [Image description: A rubber disc with a hole in the center, designed to seal the flush valve] || Chain | Connects the flapper to the flush lever, lifting the flapper when you flush | [Image description: A chain with a hook on one end, attached to the flapper and the other end to the flush lever] || Clip | Secures the flapper to the flush valve | [Image description: A metal clip that holds the flapper in place on the flush valve] |
Selecting the Right Flapper
When selecting a new flapper, consider the following factors:* Toilet model:Different toilet models have different flush valve designs, so it’s important to choose a flapper that is compatible with your toilet.
Flapper material
Flappers are made from different materials, such as rubber, plastic, or silicone. Rubber flappers are the most common, but plastic and silicone flappers are more durable and resistant to wear and tear.
Compatibility with existing components
Ensure the new flapper is compatible with the existing chain, clip, and flush valve. Flapper Types and Comparison| Flapper Type | Pros | Cons | Price Range | Suitability ||—|—|—|—|—|| Rubber flapper | Affordable, easy to install | Prone to wear and tear, may need replacement frequently | $5-$10 | Most toilet models || Plastic flapper | More durable than rubber flappers, resistant to wear and tear | May not be compatible with all toilet models | $10-$20 | Most toilet models || Silicone flapper | Most durable, resistant to wear and tear, long lifespan | May be more expensive than other flapper types | $20-$30 | Most toilet models | Identifying the Correct FlapperTo identify the correct flapper for your toilet, locate the model number on the toilet tank or bowl.
You can then use this model number to search for compatible flappers online or at a local hardware store.
Writing a Guide for Flapper Replacement
Replacing a Flapper: A Step-by-Step Guide
- Turn off the water supply.Locate the shut-off valve for your toilet and turn it off.
- Flush the toilet.This will empty the tank and allow you to access the flapper.
- Remove the old flapper.Carefully lift the flapper off the flush valve.
- Install the new flapper.Place the new flapper onto the flush valve, ensuring it is properly seated.
- Secure the flapper.Some flappers have a chain that needs to be attached to the flush lever. Others have a clip that needs to be secured to the flush valve.
- Turn the water supply back on.Slowly turn the water supply valve back on, checking for leaks.
Safety Precautions
- Always turn off the water supply before working on any plumbing components.
- Be careful when handling sharp tools.
- Wear gloves to protect your hands from bacteria and germs.
Flapper Replacement Checklist
- Verify proper sealing.Ensure the flapper is properly sealed against the flush valve.
- Check for water tightness.Make sure there are no leaks after turning the water supply back on.
- Test functionality.Flush the toilet several times to ensure the flapper is working properly.
Other Potential Causes
Sometimes, even after you’ve checked the fill valve and flapper, that pesky whistling toilet just won’t quit. Don’t worry, there are a few other things you can check to finally get that peace and quiet back.
Overflow Tube Issues
The overflow tube is a small, often overlooked part of your toilet tank. It’s designed to prevent the tank from overflowing if the fill valve malfunctions. If the overflow tube is blocked or damaged, it can cause the water to back up into the tank, leading to a whistling sound.
- To check the overflow tube, simply remove the tank lid and look for a small, vertical tube near the center of the tank.
- Make sure the tube is clear of any debris.
- If the tube is cracked or damaged, you’ll need to replace it.
Other Components
- Toilet Bowl:A crack or chip in the toilet bowl can also cause whistling. This is because the water rushing through the crack creates a high-pitched sound. If you suspect a crack in the bowl, you’ll need to replace the toilet.
- Water Supply Line:A worn or damaged water supply line can also cause whistling. This is because the line may be vibrating or leaking, creating a sound that travels up through the toilet. Check the supply line for any signs of damage and replace it if necessary.
- Toilet Tank:If the toilet tank is cracked or damaged, it can also cause whistling. This is because the water rushing through the crack creates a high-pitched sound. If you suspect a crack in the tank, you’ll need to replace the toilet.
Preventing Future Whistling
To keep your toilet whistling-free, follow these simple tips:
- Regularly clean your toilet:This will help prevent debris from clogging the overflow tube and other components.
- Inspect your toilet regularly:Check the fill valve, flapper, and other components for signs of wear or damage.
- Replace worn or damaged parts:Don’t wait until a part breaks. Replace it as soon as you notice any problems.
DIY vs. Professional Help: Toilet Repair
You’ve reached the point where you need to decide: tackle the whistling toilet yourself or call in a professional plumber. Both options have their pros and cons, and the best choice for you depends on your skills, time, budget, and the severity of the issue.
Comparing DIY and Professional Repair
Let’s break down the advantages and disadvantages of each approach.
DIY Toilet Repair
- Pros:
- Cost Savings:DIY repairs can save you a significant amount of money, especially for simple issues. You only need to pay for the necessary parts.
- Sense of Accomplishment:Fixing your toilet yourself can be a rewarding experience, giving you a sense of pride and accomplishment.
- Learning Opportunity:It’s a chance to learn about plumbing maintenance, which can be useful for future repairs.
- Cons:
- Risk of Damage:If you’re not careful or lack experience, you could end up damaging the toilet or even your plumbing system.
- Time Commitment:DIY repairs require time to research, gather materials, and complete the work. It can be a time-consuming process.
- Potential for Frustration:If you’re not comfortable with plumbing, troubleshooting and fixing a toilet can be frustrating and challenging.
Professional Toilet Repair
- Pros:
- Expertise and Experience:Professional plumbers have the knowledge and experience to diagnose and fix toilet problems efficiently and correctly. They can identify the root cause of the issue and ensure a lasting solution.
- Warranty and Guarantee:Most plumbers offer warranties on their work, providing you with peace of mind and assurance that the repair will be done right.
- Time Efficiency:Professionals can complete the repair quickly, minimizing the disruption to your daily routine.
- Cons:
- Cost:Hiring a plumber can be expensive, especially for complex repairs. Labor fees can add up quickly.
- Scheduling:You may need to wait for an available appointment, which can be inconvenient.
- Potential for Overcharging:While most plumbers are honest, some may overcharge for simple repairs. It’s essential to get multiple quotes before making a decision.
Factors to Consider When Choosing DIY vs. Professional
| Factor | DIY | Professional |
|---|---|---|
| Complexity of Repair | Simple leaks or minor issues | Major leaks, clogged drains, or complex repairs |
| Experience Level | Basic plumbing knowledge and experience | No experience or lack of confidence |
| Time Availability | Sufficient time to research, gather materials, and complete the repair | Limited time or busy schedule |
| Budget | Limited budget | Willingness to pay for professional expertise and efficiency |
| Risk Tolerance | Comfortable with potential for damage or further complications | Prefer a guaranteed solution and minimal risk |
Guidelines for When to Call a Professional
- Recurring or Persistent Issues:If the toilet problem keeps reappearing despite attempts to fix it, it’s a sign that the underlying issue may be more complex and requires professional attention.
- Major Leaks:Large leaks that cause water damage or pose a safety hazard should be addressed by a professional plumber immediately. This can prevent further damage and ensure the safety of your home.
- Clogged Drains:Severe clogs that cannot be resolved with common methods, such as plungers or drain cleaners, require professional intervention. Plumbers have specialized tools and techniques to clear stubborn clogs effectively.
- Complex Repairs:Issues that require specialized tools or knowledge, such as replacing the entire toilet mechanism, are best left to professionals. They have the expertise and equipment to handle these complex repairs correctly.
- Lack of Confidence:If you are unsure about your ability to complete the repair safely and effectively, it’s always better to err on the side of caution and hire a professional. This ensures the job is done right and minimizes the risk of further damage.
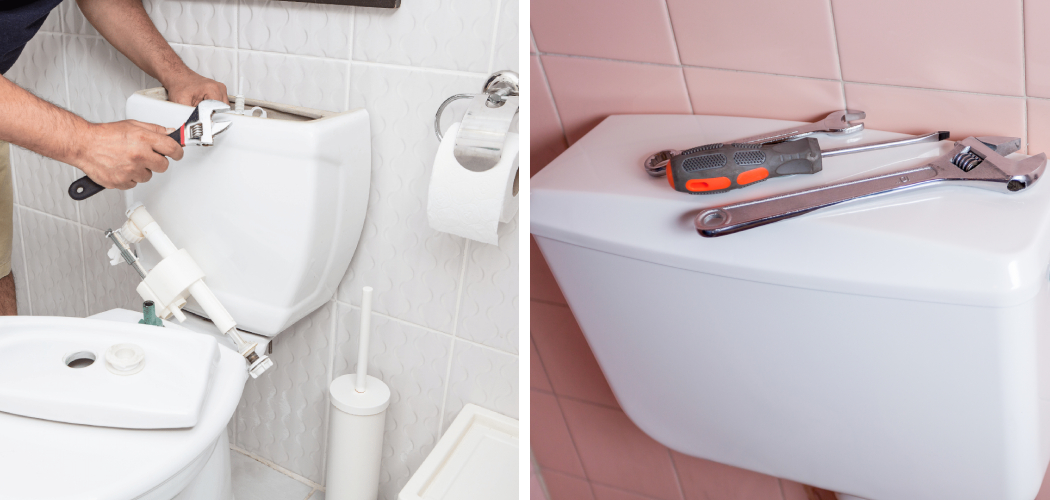
7. Tools and Materials for Toilet Repair

Alright, so you’re ready to tackle that whistling toilet, and you’re probably thinking, “What do I need to get this job done?” Don’t worry, we’ve got you covered! This section will break down the essential tools and materials needed for a successful toilet repair.
It’s like having your own personal toolkit for those pesky plumbing issues.
Essential Tools and Materials
You’ll need a few key tools and materials to fix a whistling toilet. It’s like having a well-equipped toolbox for a DIY plumbing project. Here’s a list of essentials:
- Tools:
- Adjustable Wrench:This versatile tool is used to tighten and loosen nuts and bolts on the toilet, like the ones holding the fill valve or the supply line. It’s like a universal key for plumbing connections.
- Channel-Lock Pliers:These pliers are great for gripping and turning various components, especially those with odd shapes or sizes. They’re like a strong hand for holding onto parts.
- Flat-Head Screwdriver:This screwdriver is essential for removing screws securing the toilet seat and tank lid. It’s like the key to opening up the toilet’s secrets.
- Phillips-Head Screwdriver:You’ll need this screwdriver for attaching and detaching components with Phillips-head screws. It’s like the other half of the key to opening up the toilet’s secrets.
- Plumber’s Tape:This tape is used to seal threaded connections, preventing leaks. It’s like a magical sealant for plumbing joints.
- Utility Knife:A utility knife is helpful for cutting and trimming materials like caulk and tape. It’s like a precision tool for plumbing projects.
- Level:A level ensures the toilet is installed correctly and sits level. It’s like a judge for a perfectly balanced toilet.
- Bucket:You’ll need a bucket to collect water during the repair process. It’s like a safety net for any spills.
- Shop Towels:Shop towels are handy for wiping up spills and cleaning surfaces. They’re like the cleanup crew for your plumbing project.
- Materials:
- Toilet Repair Kit:A toilet repair kit includes common parts like a flapper, fill valve, and other potential replacement items. It’s like a one-stop shop for toilet repairs.
- Caulk:Caulk is used to seal the base of the toilet to the floor, preventing leaks. It’s like a watertight barrier for your toilet.
- Wax Ring:A wax ring creates a watertight seal between the toilet and the drain pipe. It’s like a seal of approval for a leak-free toilet.
- Toilet Tank Bolts:These bolts secure the toilet tank to the bowl. They’re like the anchors for your toilet’s stability.
- Toilet Seat and Lid:These are optional replacements if you need to replace them. It’s like giving your toilet a new look.
- Wear protective gear: This includes safety glasses to protect your eyes from splashing water or debris, gloves to prevent skin irritation from chemicals or rust, and sturdy shoes to provide good footing on wet surfaces.
- Use caution with tools: Handle tools like wrenches and screwdrivers with care to avoid injuries. Make sure your tools are in good condition and avoid using damaged or worn-out tools.
- Be aware of electrical hazards: If you need to work near electrical outlets or wiring, ensure the power is switched off and the circuit is de-energized. Avoid contact with water and electrical components simultaneously.
- Ventilate the area: If you’re working with any chemicals or cleaning products, ensure adequate ventilation to avoid inhaling fumes. Open windows or use a fan to circulate air.
- Keep children and pets away: For their safety, keep children and pets out of the area while you’re working on the toilet. The tools and materials used for plumbing repair can pose a hazard to them.
- Use a stepladder if needed: Avoid reaching or straining while working on the toilet. Use a sturdy stepladder if you need to reach high areas.
- Work in a well-lit area: Ensure sufficient lighting to see what you’re doing. A well-lit workspace reduces the risk of accidents.
- Clear the area around the toilet: Remove any obstacles, like rugs or furniture, that could cause you to trip or fall.
- Use caution with sharp objects: Handle sharp objects, such as knives or utility blades, with care. Cut away from your body and keep your fingers out of the way.
- Dispose of waste properly: Dispose of any waste, like old parts or packaging, properly to prevent contamination or hazards.
- Monthly:Check the flapper for wear and tear. If it’s looking a little ragged, it’s time for a new one. Also, give the tank a quick clean with a mild cleaner to prevent mineral buildup.
- Every 6 months:Clean the toilet bowl with a good cleaning solution. This will help to prevent stains and buildup. Also, check the fill valve for leaks and replace it if needed.
- Annually:Give your toilet a deep clean, including the tank and the bowl. This is a good time to check for any other potential problems, like leaks or cracks.
- Running toilet:This is a classic sign of a worn-out flapper. Replace the flapper and you’ll be good to go!
- Slow flushing:This could be a sign of a clogged drain or a faulty flapper. Check the flapper first. If it’s not the culprit, you might need to call in a plumber to deal with the clog.
- Leaking toilet:This could be a sign of a faulty fill valve, a worn-out flapper, or a crack in the bowl. Check the flapper and the fill valve first. If the leak persists, you’ll need to call in a professional.
- Avoid flushing anything other than toilet paper:Flushing anything else, like wipes or paper towels, can clog the drain and damage the toilet. It’s better to be safe than sorry!
- Don’t use harsh chemicals:Harsh chemicals can damage the porcelain and shorten the life of your toilet. Stick to mild cleaners and you’ll be good to go!
- Keep the tank clean:Mineral buildup in the tank can damage the fill valve and the flapper. Regular cleaning will help to prevent this.
Safety Precautions

Working on your toilet might seem like a simple task, but it’s crucial to prioritize safety. Plumbing involves water, which can create hazards if not handled correctly. Let’s dive into some important safety measures to ensure a smooth and accident-free repair.
Turning Off the Water Supply
Before you even think about touching your toilet, the first and most crucial step is to turn off the water supply. This is essential for preventing a flood in your bathroom. The water supply valve for your toilet is usually located behind the toilet, near the wall.
It will look like a small handle or knob. Turn it clockwise to shut off the water flow.
General Plumbing Safety Checklist
Preventing Accidents and Injuries, How to fix a whistling toilet
Maintenance and Prevention
Just like a good surf session needs a proper wax job, your toilet needs regular maintenance to keep it running smoothly. A little TLC now can save you from a major plumbing headache later! Here’s the scoop on keeping your throne in tip-top shape:
Schedule for Regular Toilet Maintenance
Regular maintenance is key to preventing whistling and other toilet woes. Think of it as your toilet’s own personal yoga routine! Here’s a simple schedule to keep your toilet happy:
Identifying and Addressing Minor Problems
Just like a good surfer knows when their board needs a fix, you should be able to spot minor toilet problems before they become major issues. Here’s how:
Extending the Life of Your Toilet
Just like a good surfboard can last for years with proper care, your toilet can too! Here are some tips to help you extend its life:
Essential Questionnaire
What if the whistling sound is coming from the toilet bowl?
If the whistling sound is coming from the toilet bowl, it could indicate a problem with the drain pipe or a blockage in the sewer line. You may need to call a professional plumber to diagnose and resolve this issue.
How often should I check my toilet for potential problems?
It’s a good idea to inspect your toilet tank and components at least once a year to ensure everything is in good working order. This can help prevent minor issues from turning into major problems.
Can I use a different type of flapper for my toilet?
It’s important to choose a flapper that is compatible with your toilet model. Check the manufacturer’s specifications or consult a plumbing supply store for guidance.
