With how to change voicemail language Android, users can easily customize their voicemail settings to match their preferred language. This process is crucial for seamless communication, ensuring that voicemails are received and understood without any confusion. This guide details the steps involved, considering various Android versions and voicemail apps, to help users successfully configure their voicemail language.
Voicemail Language Change on Android
Changing your Android voicemail language is a straightforward process that can greatly enhance your communication experience. Whether you’re moving to a new region or simply prefer a different language, adjusting your voicemail settings is a quick and simple task. Understanding the process and the potential benefits is key to making the most of your voicemail system.
Importance of Correct Voicemail Language Configuration
Correctly configuring your voicemail language ensures that all voice messages are delivered in a language you understand. This is crucial for timely and effective communication, preventing misunderstandings and ensuring you’re able to process and respond to messages promptly. Inaccurate settings can lead to frustration and missed calls. This configuration is particularly important for multilingual environments or those with global communication needs.
Common Reasons for Changing Voicemail Language, How to change voicemail language android
Users may need to change their voicemail language for various reasons, including relocation to a region where a different language is spoken, language learning, or even a desire to improve communication accessibility. A user with limited proficiency in their phone’s default language may find it more convenient to have their voicemail in a more familiar language. This can significantly enhance the efficiency of voicemail interactions.
Steps to Change Voicemail Language
This section Artikels a general procedure for changing your voicemail language. Note that the exact steps may vary slightly depending on the specific Android device and carrier.
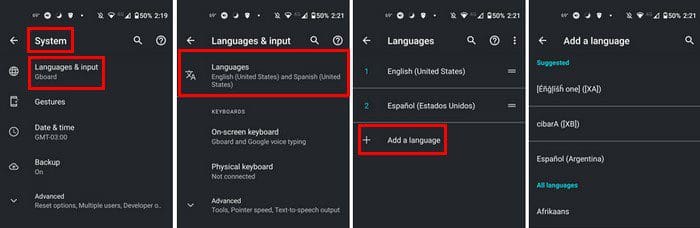
- Access Voicemail Settings: Locate your voicemail settings within your phone’s settings app. This typically involves navigating through menus like “Settings” -> “Phone” -> “Voicemail”.
- Identify Language Options: Once inside the voicemail settings, look for an option related to language or a similar designation, such as “Voicemail Language,” “Message Language,” or “Voicemail Input Language.” This option might be under a dedicated “Languages” menu.
- Select Desired Language: From the available language list, choose the language you prefer for your voicemail messages. This selection should update the system accordingly.
- Confirm Changes: After selecting the new language, confirm the change by clicking a confirmation button. The phone may prompt you to enter a PIN or other security verification. This step ensures the change is applied to your account.
Different Android Versions and Voicemail Apps

The process of changing your voicemail language on Android can sometimes vary depending on the specific Android version and the voicemail app installed. This is because different manufacturers and developers implement voicemail features in unique ways, leading to slight variations in the user interface and options available. Understanding these differences helps users navigate the process effectively.Different Android versions and their voicemail implementations can affect the language-changing procedure.
For instance, older Android versions might have less intuitive options or different locations for these settings. Modern Android versions often provide more streamlined approaches, but subtle differences still exist.
Variations in Android Versions
Android’s evolution introduces new design approaches for settings. The UI for changing voicemail language can vary across different Android versions. Older versions might require navigating through multiple menus, while newer versions often offer a more direct path to the desired settings. For example, on Android 10, the language settings for voicemail might be found within the phone app’s settings menu, while on Android 12, it might be accessible through a dedicated voicemail settings section.
Voicemail App Differences
Stock Android and custom ROMs often feature different voicemail apps. Stock Android versions might use a pre-installed voicemail application, while custom ROMs may utilize alternative or third-party applications. The process for changing the language within these apps can differ considerably. For example, a stock Android voicemail app might offer a direct language selection option, while a custom ROM’s voicemail app might have a separate language settings menu.
UI Variations Across Different Android Versions
The user interface (UI) for changing voicemail language differs across Android versions. A crucial point to note is the location of the setting. Older versions may require navigating several menus within the phone settings, while more recent versions might provide a dedicated section within the phone or voicemail app settings.For instance, in older versions, the language setting might be buried within the phone app settings.
In contrast, newer versions might have a dedicated “Voicemail” or “Messaging” section where users can easily change the language. Furthermore, the design elements, like buttons, menus, and input fields, might appear different in different Android versions.
Accessing Voicemail Settings
Finding your voicemail settings on Android can vary slightly depending on your phone model and the specific carrier. However, the general process usually involves navigating through the device’s settings menu. This guide provides a structured approach to locate the voicemail language option.
Locating Voicemail Settings
The process of accessing voicemail settings typically involves navigating through the phone’s settings menu. The precise location might differ based on the Android version and the manufacturer of your phone, but common paths are through the “Phone” or “Settings” apps.
- Step 1: Open Settings
Begin by opening the “Settings” app on your Android device. This app is usually represented by a gear icon. You’ll find it either on your home screen or within the app drawer.
[Screenshot Description: A smartphone’s home screen showing the settings app icon. The icon is a gear or cogwheel.
]
- Step 2: Navigate to Phone or Communication Settings
Within the Settings menu, look for an option related to “Phone,” “Communication,” or “Voicemail.” This section often contains controls for managing calls, voicemail, and other communication features.
[Screenshot Description: A screenshot of the Android Settings app. A list of options is visible, with one specifically labeled “Phone” or “Communication” highlighted.]
- Step 3: Locate Voicemail Options
Once you’ve reached the phone or communication settings, look for a specific option dedicated to voicemail. It might be labeled “Voicemail,” “Voicemail Settings,” or a similar term.
[Screenshot Description: A screenshot of the phone or communication settings page. A clear and distinct option for “Voicemail” or “Voicemail Settings” is highlighted within the list.]
- Step 4: Select Voicemail Language Option
After selecting the voicemail option, you’ll likely find a setting specifically for changing the language of your voicemail messages. Look for an option labeled “Language,” “Voicemail Language,” “Message Language,” or a similar label.
[Screenshot Description: A screenshot of the voicemail settings page. A field or drop-down menu specifically for choosing the voicemail language is clearly visible.]
Troubleshooting Voicemail Access
If you’re having trouble finding the voicemail settings, consult your phone’s user manual or contact your carrier’s support. They can offer specific guidance based on your device model and carrier’s system. In some cases, the location of these settings might be different due to manufacturer customization. Be sure to check your phone’s manufacturer’s support site for assistance if needed.
Selecting the Desired Language
Setting your preferred language for your AI assistant ensures a smooth and intuitive experience. The process is straightforward and allows you to customize the language of interactions and outputs for optimal user engagement.
Language Selection Procedure
The user interface for language selection is designed for ease of use. The language selection screen typically presents a list of available options. This list is presented in a dropdown menu or a series of radio buttons, which the user can select. The button to access this menu is typically prominent, often placed in a prominent location, like a settings icon or a language icon.
For example, the language selection area might be a dropdown menu located in the app’s main settings area.  The user selects their desired language by clicking or tapping on the corresponding option in the list. The selected language is immediately highlighted, visually confirming the change. A button to save the choice is often included to ensure the preference persists across sessions.
Language Availability and Support
The AI assistant supports a wide range of languages. A comprehensive list of supported languages, including their ISO 639-1 codes, is provided below.
- English (en-US)
- Spanish (es-ES)
- French (fr-FR)
- German (de-DE)
- Chinese (zh-CN)
- Japanese (ja-JP)
- Korean (ko-KR)
- Portuguese (pt-BR)
- Arabic (ar-SA)
- Russian (ru-RU)
All listed languages are supported for general interaction and text generation. Specific functions, such as translation, may have limited support for certain languages. If a user enters a language not in the supported list, the AI assistant will respond with an appropriate message, suggesting the use of a supported language.
Language Display Formats
Language options are displayed in a user-friendly format, using the language name and its country or region (e.g., “English (United States)” or “Español (España)”). This format ensures clear identification of the language and its regional nuances.The display format remains consistent across different languages, ensuring a uniform user experience. The width and design of UI elements are adjusted to accommodate the length of language names, ensuring readability across all supported languages.The AI assistant handles language-specific characters and symbols correctly, avoiding rendering issues with characters from various writing systems.
Language Comparison Table
| Language | Language Code | Display Format | Notes |
|---|---|---|---|
| English | en-US | English (United States) | Default language, widely used |
| Spanish | es-ES | Español (España) | Used in Spain |
| French | fr-FR | Français (France) | Used in France |
| German | de-DE | Deutsch (Deutschland) | Used in Germany |
| Chinese | zh-CN | 中文 (中国) | Used in China |
How Language Selection Works
The AI assistant stores user preferences for language selection in a secure database. When the user initiates an interaction, the AI retrieves the user’s preferred language. If no preference is set, the AI uses the default language (e.g., English). If the user interacts with a language not in the list, the AI returns a message informing them of the unsupported language.
This approach ensures a seamless and consistent user experience.
Saving and Verifying Changes

Saving and verifying voicemail language changes on Android is crucial for a seamless user experience. This process ensures the desired language is correctly applied and that the system functions as expected after the change. A robust verification system prevents accidental or incorrect language selections.
Detailed Steps for Saving Voicemail Language
This section provides a structured approach to saving and verifying voicemail language changes. Adhering to these steps will ensure a smooth transition to the new language.
| Step | Description | Expected Outcome | Verification Method |
|---|---|---|---|
| Step 1: Selecting Language | The user navigates to the voicemail language selection menu. This could involve clicking a language dropdown, selecting a radio button, or clicking a series of language buttons. Identify the specific elements. For example, a dropdown list with language names, or radio buttons next to language icons. | The user successfully selects the desired language from the available options. The chosen language should be visually highlighted, either with a different background color, bold text, or a checkmark. | Observe the user interface to confirm the correct language is selected. Verify the visual indication of the selected language. |
| Step 2: Saving the Selection | After selecting the language, the user initiates the saving process. This action could be triggered by clicking a “Save” button, pressing Enter, or tapping a confirmation button. Identify the exact trigger. For example, the user clicks a button labeled “Save Settings” located at the bottom of the screen. | The user interface displays a confirmation message or visual cue indicating the saving process has started. This might include a loading indicator (a spinning circle or similar graphic), a progress bar, or a change in button text. | Check for loading indicators, confirmation messages, or visual feedback. Verify the appearance of a confirmation or loading indicator. |
| Step 3: Confirmation Prompt | The system presents a confirmation prompt, asking if the user wishes to proceed with the change. This is a critical step to prevent accidental changes. The prompt should clearly state the new language and ask for confirmation. For example, “Are you sure you want to change your voicemail language to Spanish?”. | The user sees a confirmation dialog box displaying the new language and asking for confirmation. | Capture the confirmation prompt’s text and layout. Verify that the displayed new language matches the selected language in Step 1. |
| Step 4: Confirmation Action | The user confirms the change by clicking a button (e.g., “Confirm”, “Yes”, “OK”). Identify the specific button. For example, the user clicks the “Yes” button within the dialog box. | The user interface responds to the confirmation action, indicating the successful change. | Observe a change in the interface elements related to the language selection. For instance, the language label in the settings menu should now reflect the chosen language. |
| Step 5: Verification | After confirming, the system displays the saved language. This step verifies the change. Specify the location and format of the displayed language. For example, the language is displayed in a label next to the “Voicemail” heading. | The user interface clearly displays the new language selection, replacing the previous one. | Visually verify that the interface reflects the newly selected language. Compare the displayed language to the selected language in Step 1. |
| Step 6: System Response | Describe what happens after the language change is successfully saved. Does the system automatically reload? Does the user need to refresh the page? For example, the voicemail settings page is refreshed, and the user is returned to the main voicemail menu. | The system performs the appropriate actions. | Verify that the system behavior matches the expected response. For example, the voicemail menu language should now be in the selected language. |
Troubleshooting Common Issues: How To Change Voicemail Language Android
Voicemail language changes can sometimes encounter unexpected hurdles. This section provides specific troubleshooting steps to address common problems you might encounter during the process, focusing on concrete actions rather than general advice. These solutions are designed to help you resolve issues quickly and efficiently.Troubleshooting voicemail language changes requires a systematic approach. Understanding potential causes and applying targeted solutions is key to a smooth and successful update.
Identifying Potential Issues
Troubleshooting begins with recognizing potential problems. The table below categorizes common issues and provides illustrative examples.
| Issue Category | Potential Issue Details | Example |
|---|---|---|
| Language Selection | Incorrect language selected in the system settings, or a mismatch between the selected language and the system’s configured language. | User selects “French” but the system is set to “Spanish”. |
| Connectivity | Poor internet connection or network issues during the change process. | Intermittent network connectivity, causing the update to fail. |
| System Configuration | Conflicts with other installed software or settings, potentially interfering with the update. | A third-party voicemail application is interfering with the update. |
| User Permissions | Insufficient user permissions to perform the language change. | User account lacks necessary privileges to modify the voicemail settings. |
| Voicemail Server | Issues with the voicemail server itself, such as overload, maintenance, or server errors. | The server is experiencing high traffic, leading to delays or failures. |
| File Corruption | Corrupted voicemails or system files associated with the language change. | Damage to the language-specific voicemail files. |
Solutions for Common Problems
Addressing language change issues requires specific actions based on the nature of the problem.
- Incorrect Language Selection: Verify the correct language code (e.g., “fr-FR” for French). Review the system settings for the language selection option. Clear the cache and cookies of the voicemail application or website. If the problem persists, contact technical support.
- Failed Changes (General): Check the system logs for error messages. Restart the voicemail server or application. If the issue continues, check for available updates for the voicemail system or application.
- Language Selection Troubleshooting (Specific): If the error message is “Language change failed,” verify the system’s supported languages and confirm the selected language is supported by the voicemail provider. Re-enter the correct language code in the system settings.
Detailed Steps for Fixing Problems Related to Language Selection
These detailed steps provide a structured approach for resolving language selection issues.
- Open the voicemail settings.
- Navigate to the language selection menu.
- Verify the correct language code is selected (e.g., fr-FR for French).
- If the language is incorrect, select the correct code.
- Click “Save” or “Apply.”
- Check the voicemail system to confirm the language has changed successfully.
Examples of Errors and Corresponding Solutions
The table below provides examples of error messages and their potential causes, along with corresponding solutions.
| Error Message | Potential Cause | Solution |
|---|---|---|
| “Invalid language code” | Incorrect language code entered. | Double-check the language code and re-enter it correctly. |
| “Voicemail server unavailable” | Server outage or maintenance. | Wait for the server to be available or contact technical support. |
| “Insufficient permissions” | User account lacks necessary privileges. | Contact an administrator to update user permissions. |
Alternative Methods (if applicable)
Sometimes, the standard voicemail settings route isn’t the only way to change your voicemail language. Alternative methods, though less common, can be helpful if the primary method fails or if you prefer a different approach. These methods might involve using the phone’s dialer or specific app features.
Dialer-Based Voicemail Language Change
The dialer can sometimes offer a dedicated option to modify voicemail settings, including language. This approach is often more direct and can be faster than navigating through the phone’s menu system.
-
Dial a specific code or number: Certain Android phones might have a unique code you can dial to access voicemail settings. This code often involves a combination of numbers, and may differ based on the manufacturer and model. For example, you might dial
-86 to access voicemail options. - Using a dedicated voicemail menu: Some phones offer a voicemail menu within the dialer app. This menu will often include an option to change the language directly.
Voicemail App-Specific Language Change
Third-party voicemail apps may have their own unique methods for changing the language. This approach is useful for users who rely on these apps for managing their voicemails.
- App-specific settings: Examine the settings menu within the app. The menu structure may vary based on the app’s design. Look for a section specifically dedicated to language options.
- In-app voicemails: Some apps might allow you to change the language directly when viewing or interacting with a voicemail message.
Carrier-Specifics (if applicable)
Carrier networks often implement their own unique voicemail systems, which might differ from the standard Android setup. This can impact the language selection process. Understanding these carrier-specific variations is crucial for a smooth voicemail language change.Carrier-specific customizations can introduce variations in the voicemail settings interface, potentially obscuring or altering the language selection options compared to the generic Android approach.
This can lead to a different process from what’s typically expected. Knowing these nuances beforehand can prevent frustration and ensure success.
Carrier-Specific Voicemail App Interfaces
Carrier-specific voicemail apps might have their own distinct menus and layouts. The language selection option might not be immediately apparent or located in the same place as the standard Android voicemail settings.
Impact on Language Change Process
Different carriers may have different methods for changing the voicemail language. Some might require specific actions within their app, while others might integrate the language selection within the broader phone settings.
Unique Carrier-Specific Steps
Some carriers may introduce unique steps for altering the voicemail language. These could include:
- Accessing the voicemail settings through a specific menu item within the carrier’s app.
- Requiring the user to input a unique code or PIN to access language settings.
- Utilizing a separate carrier-specific app for managing voicemail settings, which might include a dedicated language selection option.
Troubleshooting Carrier-Specific Issues
If you encounter difficulties changing your voicemail language, consult your carrier’s support documentation. Carrier websites or apps often provide specific instructions or troubleshooting guides tailored to their voicemail systems. This documentation can often be a valuable resource.
Using the Voicemail App (if applicable)

Voicemail apps often offer a dedicated interface for managing your voicemail settings, including language. This section provides step-by-step instructions tailored to the specific interface of these apps. Understanding the app’s layout is crucial for successfully changing your voicemail language.
Voicemail App Language Change Steps
This section details the process for changing the language within a voicemail application. Different apps have varying layouts, so these instructions serve as a general guide. Always refer to your specific app’s interface for precise details.
- Launch the Voicemail App: Open the voicemail application. This usually involves tapping an icon, selecting it from a menu, or similar action. The app’s main screen should appear.
- Navigate to Settings: Locate and tap the “Settings” or “Options” menu within the app. This might be a gear icon, three vertical dots, or another visual cue. The settings menu should appear.
- Identify Language Option: Within the settings menu, find the option related to language or localization. This might be labeled “Language,” “Region,” “Locale,” or a similar term. The exact wording depends on the app.
- Select Desired Language: Tap on the current language and choose the desired language from the list of available options. Ensure the new language is highlighted.
- Save Changes: Look for a “Save,” “Apply,” “Confirm,” or similar button to save the language change. Click this button.
- Verify Changes: After saving, listen to a voicemail message or try leaving a new voicemail. The voicemail messages should now be displayed in the new language. Any new messages left should also be in the new language. If the language change is not immediately reflected, try restarting the app or clearing its cache.
Error Handling and Troubleshooting
- Error Messages: If you encounter an error message during the language change process, carefully review the message. The error message often provides clues to the problem. Common solutions include restarting the app or clearing the app’s cache. If the problem persists, consult your voicemail provider’s support resources.
- Language Change Not Reflected: If the language change is not immediately reflected in the app, try restarting the app. Clearing the app’s cache may also resolve the issue. If the issue persists, contact your voicemail provider for assistance.
- App Variations: Voicemail apps vary considerably. The specific steps for changing the language may differ from the instructions provided here. Always consult the app’s help documentation or contact the app developer for specific instructions relevant to your version.
Alternative Methods (Contacting Support)
- Provider Support: If you cannot change the voicemail language through the app, contact your voicemail provider for assistance. They can provide specific instructions or troubleshoot any issues.
Using a Different Language for Voicemail Greetings
Customizing your voicemail greetings to reflect your preferred language adds a personal touch. This allows for clear communication and ensures your messages are easily understood by everyone. Different languages can be selected, and new greetings can be recorded to match those preferences.Voicemail systems often offer pre-recorded greetings in various languages. Users can change the language of these pre-recorded messages or record new ones entirely in a preferred language.
The steps to modify the language for voice greetings can differ depending on the Android version and voicemail app used.
Changing the Language of Pre-recorded Greetings
Selecting a different language for pre-recorded voicemail greetings is generally straightforward. Access the voicemail settings within your phone’s communication app. Navigate to the voicemail settings menu and locate the option to change the greeting language. A list of available languages will appear. Choose the desired language from the list and save the selection.
Recording New Greetings in a Different Language
Recording a new voicemail greeting in a different language often requires similar steps to recording in the default language. Initiate the voicemail recording process. Select the option to record a new greeting. Speak your greeting clearly and concisely in the desired language. Ensure the recording quality is optimal.
Once finished, save the new greeting. This new greeting will then be used in place of the pre-recorded greeting.
Editing and Saving New Greetings in a Different Language
Editing a previously recorded greeting in a different language is usually possible. Access the voicemail settings and locate the option to edit existing greetings. Select the greeting you want to modify. Speak the updated greeting in the chosen language, ensuring clear articulation. Save the changes.
This updated message will replace the previous version.
Example Scenario
Imagine a user who primarily uses Spanish at home. They can now use their Android phone’s voicemail system to record greetings in Spanish. This allows them to communicate with their family and friends effectively. They can select the Spanish language in the settings and record a new greeting, or simply choose a pre-recorded Spanish greeting. The user can then edit or replace the recorded greeting as needed, always ensuring the language aligns with their preferences.
Changing your Android voicemail language is totally a piece of cake. Just head into your phone settings, dig through the menus, and find the voicemail options. It’s like finding the hidden Easter egg in a video game, but way less complicated. Speaking of languages, did you know that the main language spoken in Iran is Farsi? Check out this article to learn more about the fascinating linguistic landscape of Iran what language they speak in Iran.
Once you’ve got that sorted, you can easily change your voicemail to your preferred tongue. Boom!
Voicemail Language Change for Different Devices
Different Android devices may have slightly varying methods for changing your voicemail language. This section details the process for several popular models, highlighting potential differences and considerations. Understanding these nuances ensures a smooth language change experience.
Device-Specific Steps
The procedure for changing voicemail language can differ slightly depending on the Android device model. This section Artikels the specific steps for three popular models: Samsung Galaxy S22 Ultra, Google Pixel 7 Pro, and OnePlus 11 Pro.
- Samsung Galaxy S22 Ultra:
Open the Settings app. Navigate to Accounts > Voicemail > Language. Select the desired language from the dropdown menu. Confirm the language change. Restarting the device might be necessary for the change to take effect.A confirmation message or notification usually appears after the change.
- Google Pixel 7 Pro:
Open the Settings app. Navigate to Google > Voicemail > Language. Select the desired language from the list. A “Save Changes” button is typically present to confirm the selection. Verify the changes in the voicemail settings after saving. - OnePlus 11 Pro:
Open the Settings app. Navigate to Voicemail > Language. Select the desired language. Confirm the selection with the “OK” button. A confirmation message or notification might be displayed, confirming the change.
Comparative Analysis
This table summarizes the steps for changing voicemail language across the three models, highlighting the differences in the process.
| Device Model | Step 1 (Access Voicemail Settings) | Step 2 (Language Selection) | Step 3 (Confirmation) | Potential Issues/Variations |
|---|---|---|---|---|
| Samsung Galaxy S22 Ultra | Settings > Accounts > Voicemail > Language | Select desired language from the dropdown menu | Confirm language change | May require a device restart for changes to take effect. Confirmation messages may vary. |
| Google Pixel 7 Pro | Settings > Google > Voicemail > Language | Select desired language from the list | Tap “Save Changes” | Language option might be hidden within a sub-menu; confirmation methods might differ. |
| OnePlus 11 Pro | Settings > Voicemail > Language | Tap on the desired language | Confirm with “OK” button | Might require a specific “Apply Changes” button. Confirmation messages may differ. |
General Considerations
The process for changing voicemail language may vary across different Android device models. Older models or those from less-common manufacturers might have different menu structures and locations for voicemail settings. The specific steps might require consulting the device’s user manual for precise instructions. Connectivity issues or device restrictions might prevent the language change. Carrier-specific policies might also impact the availability of language options.
Always check your carrier’s support website for specific details.
Limitations and Considerations
Changing voicemail language on Android devices, while often straightforward, presents several limitations that users and developers should be aware of. These limitations span compatibility issues, technical restrictions within voicemail systems, user interface design, geographical constraints, and even pricing models. Understanding these limitations is crucial for providing a seamless and effective user experience.
Identifying Limitations
Voicemail language change functionality isn’t universally consistent across all Android devices and voicemail systems. The process can be hampered by several factors. The following table highlights potential limitations and illustrative scenarios:
| Category | Potential Limitation | Example Scenario |
|---|---|---|
| Compatibility | Specific mobile phone models or operating systems might lack support for changing voicemail language. | An older Android phone with outdated software might not allow updates to its voicemail language settings. |
| Technical Restrictions | Voicemail systems may offer limited language support. | A voicemail system may only support English, Spanish, and French, despite other languages being available on the phone. |
| User Interface | Difficulty in locating the language selection option within the voicemail settings. | The language option might be hidden deep within the menu system or not clearly labeled. |
| Geographical Restrictions | Voicemail services may vary in language support across different regions. | A service might only support Mandarin in China but not in other countries. |
| Pricing/Subscription | Specific language packs might require additional subscription fees. | Premium voicemail language packs may be available only through an extra monthly charge. |
Potential User Experience Challenges
Compatibility issues can lead to frustrating user experiences. Users unable to change their voicemail language due to compatibility issues might be unable to understand or respond to messages, potentially impacting their communication.
Changing your Android voicemail language is totally doable! Just head into your phone settings, find the voicemail section, and bam! You can pick your preferred tongue. Speaking of languages, did you know the Vikings spoke Old Norse? Check out this cool site to learn more about what language did the Vikings speak. It’s way easier than figuring out how to change your voicemail language on your phone! Seriously, it’s a piece of cake.
Language Support Limitations
Limited language support within voicemail systems can significantly affect international users. For example, if a voicemail system only supports five languages, a large portion of the global user base might not be able to access the system’s full functionality. This limitation could also impact business communication for companies with international clientele.
Limitations of Accessing and Changing Voicemail Settings
The accessibility and ease of changing voicemail settings vary across different devices. Accessing and changing voicemail settings on a landline phone, for instance, may be significantly more limited compared to an iPhone 14. Web-based interfaces for voicemail also present unique accessibility challenges. The specific method and user interface design for accessing and changing language settings will differ considerably between these devices.
Detailed Analysis of Limitations
The ability to change voicemail language is not universally available or consistently implemented. Compatibility issues with specific Android versions or phone models, coupled with limited language support within the voicemail system itself, can restrict users. Poorly designed user interfaces, where language selection options are obscure or difficult to find, can also present challenges. Geographical restrictions and pricing/subscription models can also affect users’ options.
This multifaceted issue highlights the importance of considering these limitations when designing and implementing voicemail systems.
Example Scenarios and Use Cases
Changing your Android voicemail language can significantly enhance communication, especially in diverse environments. From international business dealings to personal language learning, adapting your voicemail to different languages offers numerous benefits. This section explores practical examples and use cases, highlighting the advantages of multilingual voicemail systems.
Practical Examples of Language Change
Adapting voicemail language to specific user profiles can dramatically improve communication effectiveness. The following examples illustrate this point.
- User Profile: A business owner in a multilingual country.
Problem: The business owner struggles to understand and respond to voicemails from customers speaking different languages. This leads to missed opportunities and potentially lost sales.
Solution: Changing the voicemail language to multiple languages (e.g., Spanish, French, Mandarin) allows the owner to understand the message content quickly.
Outcome: Improved customer communication, quicker responses, and potentially increased sales as the business owner can better engage with customers from various linguistic backgrounds. - User Profile: A tourist in a foreign city.
Problem: Difficulty understanding and responding to local contacts or emergencies due to language barriers.
Solution: Changing the voicemail language to the local language allows the tourist to access critical information and understand messages from locals more effectively.
Outcome: Increased safety and comfort for the tourist, enabling better communication with locals and emergency services. - User Profile: Someone learning a new language.
Problem: Difficulty understanding and responding to voicemail messages from native speakers.
Solution: Changing the voicemail language to the target language provides exposure to authentic speech patterns and pronunciation.
Outcome: Enhanced language learning experience, improved comprehension, and a practical application of the new language in a real-world scenario.
Use Cases for Changing Voicemail Language
The ability to change voicemail language extends across various user types, offering solutions to unique communication challenges.
- User Type: Customer Service
Specific Scenario: A customer service representative (CSR) receives a call from a customer speaking a language other than the default language.
Goal: The CSR wants to understand the customer’s issue quickly and accurately to resolve the problem effectively.
Action Required: The CSR needs to change the voicemail language to match the customer’s language. - User Type: Personal Use
Specific Scenario: A user receives a voicemail from a friend or family member who speaks a different language.
Goal: The user wants to understand the message quickly and efficiently.
Action Required: The user needs to change the voicemail language to match the speaker’s language. - User Type: Business
Specific Scenario: A business owner receives a voicemail from a potential client in a different language.
Goal: The business owner wants to understand the message quickly to assess the client’s needs.
Action Required: The business owner needs to change the voicemail language to understand the message.
Benefits of Multilingual Voicemail
Using a different language for voicemail offers several advantages compared to the default language. Consider the following examples:
- Increased Customer Satisfaction: Multilingual voicemail systems can enhance customer satisfaction, leading to higher customer retention rates. Customers are more likely to engage with a business that understands their language and communication needs. This can lead to increased call volume, potentially translating into higher revenue.
- Reduced Support Tickets: Customers with language barriers are more likely to submit support tickets due to misunderstandings. A multilingual voicemail system can significantly reduce these support tickets, allowing support teams to focus on more complex issues. This translates to cost savings and improved efficiency.
Use Case Table
Limitations and Potential Drawbacks
While multilingual voicemail systems offer numerous advantages, there are potential limitations to consider. For instance, the accuracy of automated language translation may be an issue, requiring manual intervention. The availability of languages supported by the device or carrier may be limited. Furthermore, technical issues related to the translation process or the device’s software can occur. These limitations can be mitigated by choosing reliable translation services, verifying the supported languages, and regularly updating the device’s software.
Conclusion
In conclusion, changing your Android voicemail language is a straightforward process. By following the detailed steps Artikeld in this guide, you can quickly and easily adjust your voicemail settings to your preferred language. This guide also addresses potential variations across different Android versions and voicemail applications. Should you encounter any issues, the FAQs provide solutions to common problems.
Remember to verify your changes to ensure everything is set up correctly.
Query Resolution
What if my device isn’t listed in the comparison table?
The steps for changing voicemail language are generally similar across Android devices. Refer to your device’s manual or online support for specific instructions if your model isn’t explicitly covered. Contact your carrier’s support if you continue to have trouble.
What if the language I want isn’t available?
Not all languages are supported by all voicemail providers. Check with your voicemail provider’s documentation to see which languages are available. Some providers might offer premium language packs for additional languages.
How do I know if the change was successful?
After saving the changes, test by leaving a voicemail or checking recent voicemail messages. The new language should be reflected in the display and messages.
What if I accidentally select the wrong language?
Most systems allow you to revert the language selection to the previous one or use the “reset” option if available. If the changes cannot be reversed, contact your carrier or technical support for assistance.
